Introduction
This blog post is the third in a series of posts on build rig architecture. The first one was a video about getting up and running with a Warewolf powered build rig in 3 easy steps, using 35 Warewolf workflows I had just published to our Shared Resources Server – store.warewolf.io . About 10 workflows expressing a build controller, and 25 expressing a build agent. The build controller workflows managed a queue of builds. Once the build controller workflows start a build, the build agent workflows always ran the same workflow, the default build process template. This had 3 sub-workflows on it: “get source code”, “compile” and “run tests” laid out to waterfall from one to the next respectively:
Then I wrote a second blog post on the 15 steps to setting up Atlassian Bamboo as a build controller with Warewolf build agents. Since I wrote that last post I have replaced most of Warewolf’s build agents with Bamboo build agents as well using an Atlassian Open Source Project License.
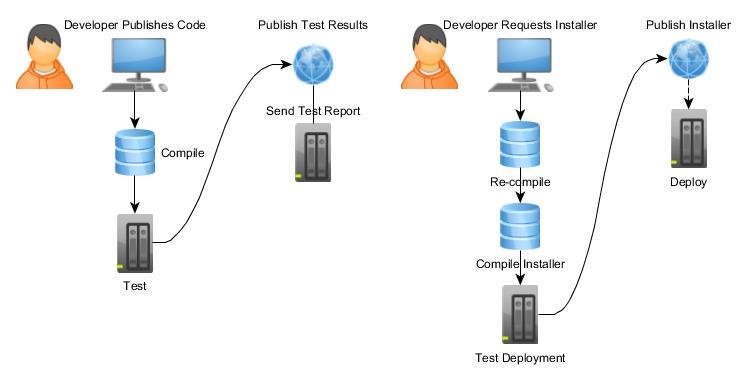
This post takes the concept of the default build process template and makes it more efficient by dissecting it and expanding it to include compiling installers, and deploying those using shared artefacts. Artefact sharing significantly changes the default build process template that build agents run. In fact, in order to use artefact sharing, the default build process template needs to be split after the compile step and before the test step. The first build process template produced by this split compiles and shares artefacts; these artefacts can be anything that is not code, from test automation scripts, to test run settings, but mostly compiled binaries. The second build process template downloads shared artefacts and runs them as a test:

The default build process still has some use in testing the entire process end-to-end on different operating system and platforms. This is what a developer would experience when working with the open source code. The real advantage of shared artefacts for open source projects is being able to release these artefacts to the public. The trick is to link source code to binaries, and binaries to test results to packaged binaries clearly. In open source projects it’s very important to give a developer on the other side of the world peace of mind knowing test results are for the binaries he expects them to be for, and were built from the exact version of source code he is expecting. It’s also very important to perform efficiently so you can scale up the amount of code the project is able to accept.
Artefact Sharing for Versioning
Efficient use of shared artefacts starts with the link between the source code version and binary version. Successive versions of source code can branch but those of binaries can’t. So a build rig will never be able to simply re-use a source code version as a binary version, it will always need to generate a new value for the binary version. This value is called the build number. Your build rig will need to generate a new version after every successful compile and store that value in two places, just to make sure that information is available to a developer. The source code repository should be tagged with it and it should be baked into the binaries by the compiler.
The most efficient way I’ve found is to have your build rig generate a new version before the compile, that way it can make sure it is entrenched into the binaries by the compiler. After the compile has completed successfully, that version should be read back out of the compiled binaries and the repository should be tagged with that value. This way there is no variable storing of the version string that could be corrupted and the code is only tagged if it can compile. This saves the developer time because he can tell if the code he just downloaded should compile by looking at its tag. Do not tag any repositories that do not have access to this release, for example do not tag your GitHub repository if the releases are only available to developers internally.
Packaging Binaries
Just like source code repositories package code, installers package binaries. The build process template for an installer is to download shared artefacts and then compile the installer with the artefacts:
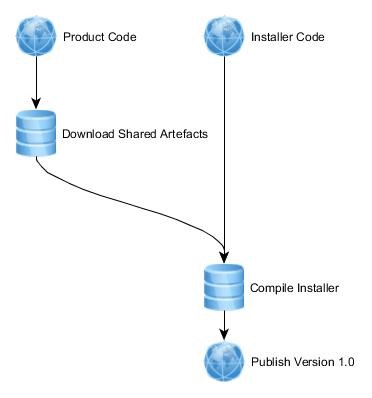
I feel the most efficient Installer builds are extremely simple. First the installer will need to know whether it’s packaging version 1.0 or 1.1. As a compile target, the version of the shared artefacts should be read and baked into the installer package by the compiler. This step should not be part of the build process template. This template is very important and should be kept as simple as possible to avoid confusion if there is a problem compiling a new installer. This build has the potential to be very confusing because there are actually two versions involved: the shared artefacts version and the freshly compiled installer package version.
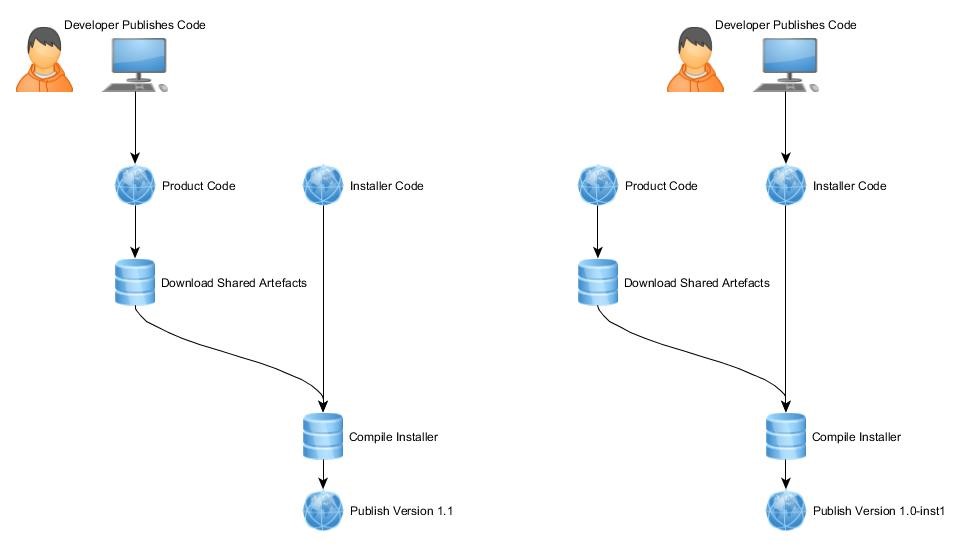
For example, if you make a code change to the installer package after compiling it, the new installer will still install the same version of the shared artefacts after it’s compiled again. To distinguish different installer builds you’ll need to get creative to make the full version string semantic. Since they are both for the same version of the product, say version ‘1.0’, in the package, they’ll have to be distinguished with a suffix like ‘–inst1’ or ‘–u2’ to indicate a new installer build for the same product build, such that the two installers are ‘1.0’ and ‘1.0-inst1’. Remember your build rig will need to be sensitive to the fact that ‘1.0-inst1’ is not an update to ‘1.0’. Starting this installer in an environment where ‘1.0’ is already installed will prompt to uninstall or repair instead of update.
Running Tests
The build rig in this case will have to make do with no source code version. In fact even reading the version baked into the shared artefacts is unnecessary. It is sufficient to log a link to the build that created the shared artefacts in the test results. Using shared artefacts makes test runs more efficient not only by saving the build from compiling code but it also makes the entire task of finding which test assemblies to run unnecessary. By downloading only the shared artefacts for the tests you want to run you would have eliminated the need to search for which test assemblies to run, you can just go ahead and run everything you downloaded. Also remember, you might also want to re-run all of your CI tests again against an installed version of you product to rule out any bugs caused by packaging the raw binaries. Here’s an example Windows command line script for running all assemblies in a folder by Visual Studio 2013 (or 2015 if you just replace %vs120comntools% with %vs140comntools%):
setlocal EnableDelayedExpansion
set "TestAssembliesList="
for /d %%d in (*) do (
	if not "%%d" == "TestResults" if not "%%d" == "TestScripts" if not "%%d" == "packages" if not "%%d" == "TestSettings" (
		set "next=%%d/bin/Debug/%%d.dll"
		set "TestAssembliesList=!TestAssembliesList! "!next!"
	)
)
set "TestAssembliesList=!TestAssembliesList:.dll=.dll"!"
"%vs120comntools%..\IDE\CommonExtensions\Microsoft\TestWindow\VSTest.console.exe"%TestAssembliesList% /logger:trx
This script, along with the artefact publishes and artefact downloads, replaced about 10 workflows I was using to parse test assembly file specifications, find those test assemblies run them from the command line.
Deployments
Just like installers package binaries, deployments package installers. Deployments are quite new to me; I have not yet found a totally efficient build process template for deployments. Right now I have my build rig trigger test deployments for all new installers as a test. This means a lot of deployments are made and they will be triggered when new code is published for either the branches of the product that are automatically packaged by the installer or to the installer code. All for the sake of total test result coverage over all changes that affect the installer.
There are subtle differences between these different trigger types that I have not yet reconciled in my process. For example, I just skip testing the update if the change was to the installer code, because our installer only considered updates to product code as a real update. Other than updating, there are 3 other main installer operations you are going to want to perform as part of testing the installer, before using it to deploy to production: repair, uninstall and fresh install. In addition to running these 4 tasks in as many different operating system and platforms as your product supports, you will want to run these 4 tasks in staging environments that replicate the operating system and platform of servers that run your product as part of production.
In the case of Warewolf, Warewolf produces itself. In a more normal environment, production servers aren’t recursive and produce a product other than the one they are currently running. In those cases you deploy as a service to your customers and not yourself. Either way obviously production servers should be treated with care, so deployments that are not test deployments may always (unfortunately for efficiency) involve some manual steps.
Conclusion
In this post I have taken you on a journey from code to production, with whistle stops to make discreet releases along the way. As you can see, not only does each release have a different version, they will also have differing versioning formats. I’ve tried to express a flow that goes in as straight a line as possible, with the different version numbers stored in as many places as possible and excluding any extra unnecessary stores of that data that could be corrupted or cause confusion. That’s the most important message of this post: confusion is the biggest source of inefficacy for a build rig.
Developers should never have to download more code or run any more tests or compile any more times than is necessary. And they won’t use source code, compiled binaries, packages or test results if they suspect the build rig didn’t put the true label on the box.
So if your build rig supports it, I recommend you refer to this post before starting to use shared artefacts, or consider using Bamboo because it is significantly different to running builds using TFS’s default build process template or the workflows that were published to https://store.warewolf.io:3143.


Leave A Comment?