Creating a REST API can be done in just a few clicks. Warewolf exposes web services or APIs which can be accessed over the web externally or used in anything you’re building. JSON and XML data is returned in a secure environment which you have full control over.
Security is handled by Windows Authentication; as such the context under which, the calling process run is important.
To create an authenticated REST API in Warewolf:
1.Click New to create a new workflow.
 2. Create new variables called Username and Password in the Variables list. Mark these as Inputs.
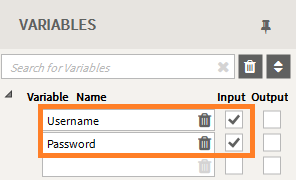
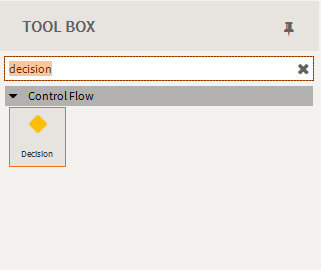
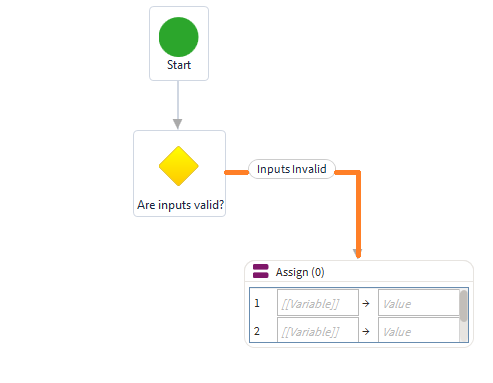
3. Search for the Decision tool in the Tool Box.
 4. Drag and drop the Decision onto the design surface. The tool will open in large view.
 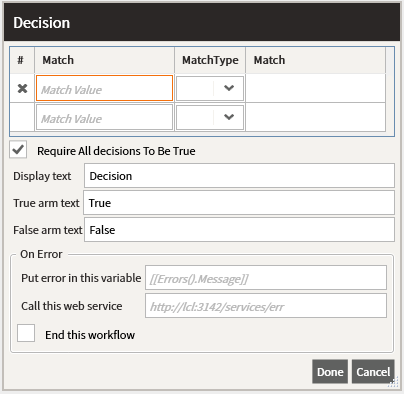 We use a Decision to check if something is True or False and execute different actions based on the decision. When creating an API in Warewolf we use this tool to rule out variables that do not match our criteria.
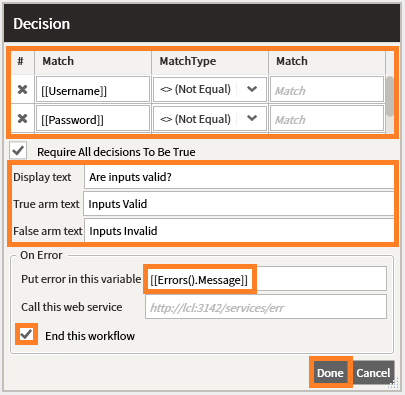
The Username and Password variables are not equal to nothing. In other words, they have a value or input.
Configure the Decision tool by adding in your variables [[Username]] and [[Password]] and setting the Match type to < > (Not Equal).
Clear the Display text and add Are Inputs Valid? This will be the text displayed in the small view to help identify what decision is being made. It does not affect the execution.
Change the True arm text to Inputs Valid and the False arm text to Inputs Invalid. These will help make your flow easier to comprehend. They do not affect the execution.
On error, add [[Errors().Message]] in the Put error in this variable field. Errors returned from the stored procedure will be written to this recordset.
Check End this workflow. This will end the workflow if an error occurs at this point.
When you have configured the Decision, Click Done.
5. Click Save. Name your API and save.
6. Search for the Assign tool in the Tool Box. Connect the Assign to the Inputs Invalid (False Arm) of the Decision to return a failed Response.
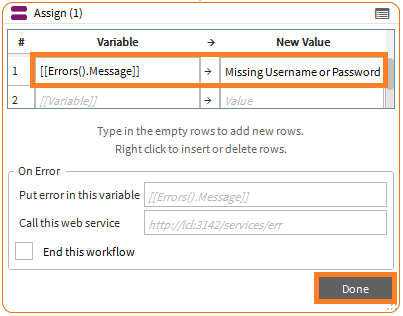
7. Configure the Assign. Add [[Errors().Message]] as the Variable. Assign the value to the variable = Missing Username or Password. Click Done.
 8. Search for the SQL Server Database tool in the Tool Box. Connect it to the Inputs Valid (True arm) of the Decision, where the inputs are valid. You can connect to any database required. We use SQL Server for this example.
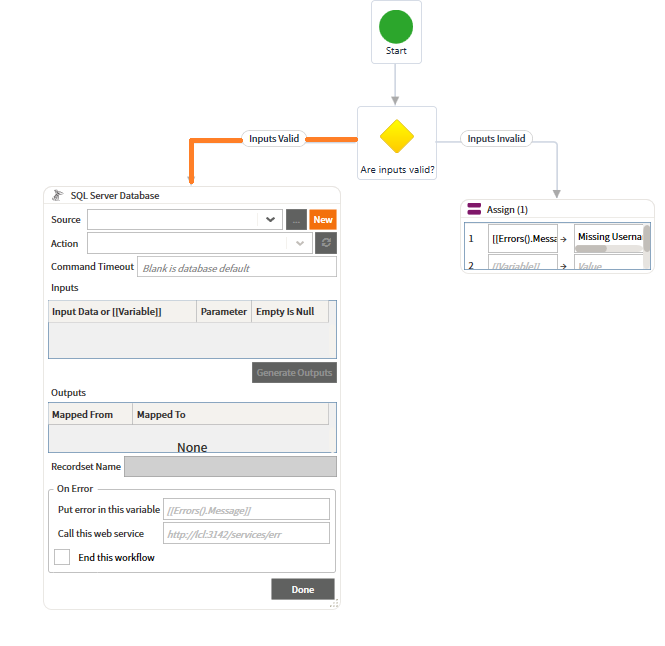 9. If you have not already configured your data source, Click New.
10. Add your Server Name, click Test Connection.

Once the connection has been established, select your Database from the dropdown list.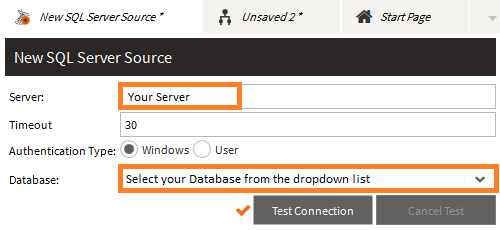
Click Save in the menu on the left. Name your database source and save.
You can read more on Adding a new Database Source.
11. Go back to your original workflow. Double click on the SQL Server Database to open it in large view.
From the Source, select the Database that you want to connect to. In this example we connect to an Example SQL Server Source.

Once you have selected your Source, the stored procedures in Action are populated. You can click the refresh button to update this list, if required. This may take a while.
Select dbo.Athenticate from the Action drop-down list. The inputs are automatically populated.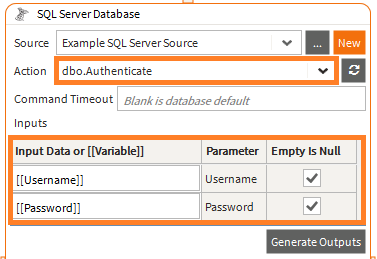
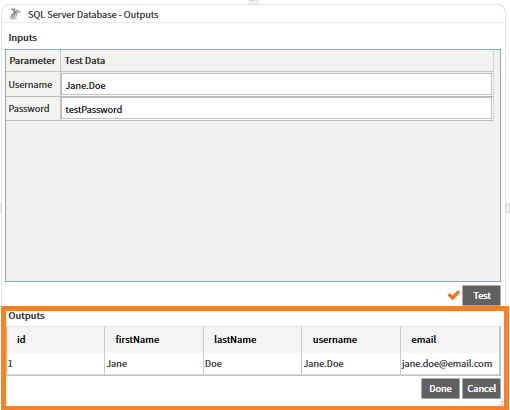
Click Generate Outputs. Enter the Username and Password parameters and click Test. See Example below.

The Outputs will now be populated with the Results. Click Done.
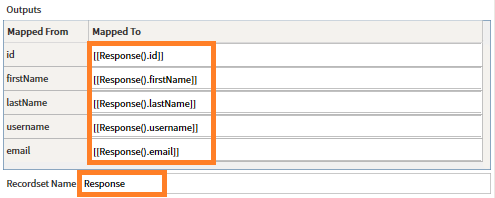
The SQL Server Database tool will be open in large view. The Outputs with the results will now be populated on the SQL Server tool.

The Recordset Name will assume the name of the stored procedure initially. This can be changed to suit your needs if required. Below we changed the name to Response.
12. Add in the Error recordset [[Error().Message]]. Errors returned from the stored procedure will be written into this recordset.
To end the workflow if an error has occurred at this point, make sure the checkbox is selected.
Click Done.

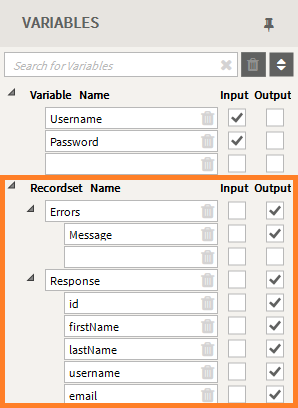
13. In the Variables list, select the Errors and Response recordsets as outputs.
14. Save the Workflow.
To access the endpoint in this way, the caller must have View and Execute permissions.
14. Click Debug to run your workflow.
In the Input Data box add in your Username and Password.
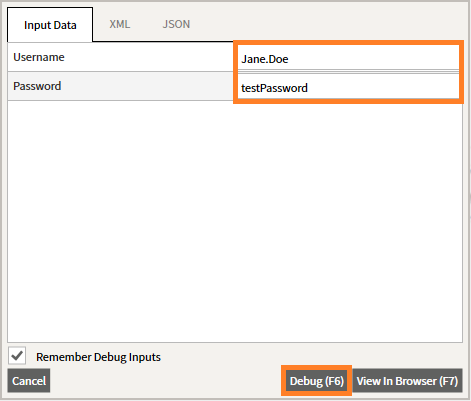
Click Debug (F6)
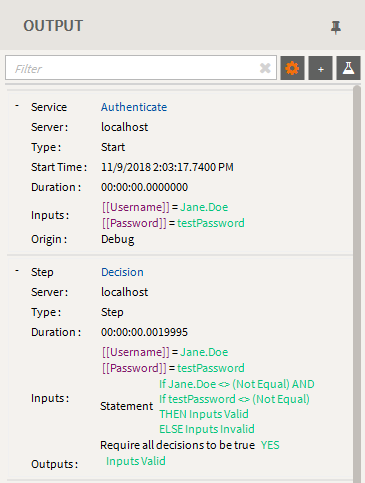
15. View your Debug Output in the Output Box. You can see the inputs added. If these were left blank in step 14, the Decision would follow a different set of actions and an error message would occur.

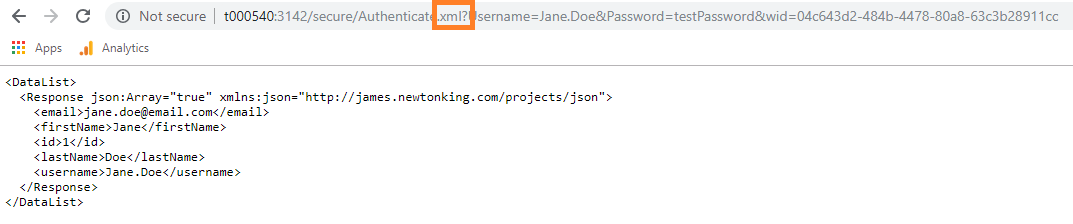
16. To view your API in JSON, debug your service in your browser. Click Debug or use the shortcut key F7. Remove the xml and replace it with json in the URL and you will have a workflow service that accepts a POST request.
Implementing the API into your web application using Angular 6
The code below would be associated with the Login Button: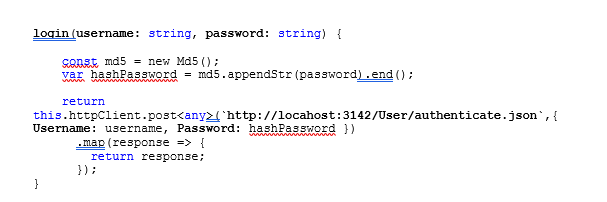
You may find these articles on Security and Web Service Endpoints helpful.